How To Do A Bow Hairstyle Step By Step : Diy Bow Hair Hair Styles Bow Hairstyle Long Hair Styles : When you are done, cover it with your hair spray.. Push a bobby pin into the top part of the spread loop and another one into the base of the spread loop. Pull hair into a high ponytail, leaving a few sections loose at the front to frame the face. This hairstyle is probably my most favorite! When you get to the bottom of the outside of the clip open the clip once again and glue the remainder of the ribbon inside the clip so that the entire alligator clip is now completely lined. You can add more style to these ribbons by creating a small bow on the top.
Turn the bow over so the right side is facing up and apply a large dot of hot glue right in the center. It will work great when your hair are not very smooth! Step 4 separate the bun top portion of hair into two to create the bow shape. Gather the rest of your ponytail and smooth it as much as possible; Use some water or hairspray, if necessary.
How To Make A Hair Bow Hair Tutorials Youtube from i.ytimg.com So, gather those items, have a seat, and make a pretty ponytail bow. Straight hair is more desirable for this style than wavy or curly hair. It is so pretty and chic but at the same time it is super easy to do! Start with a circle for the knot and then draw a total of six slightly arched lines. Pull the ponytail forward and place it into one of the hair bands, leaving some hair cuffed up top. Secure the hair bow in place with bobby pins by slotting them into the base of your ponytail. Now, the rest of your strands can be used in two ways. Fluff up your bow by spreading out the loops and gently tugging them tighter and the look is.
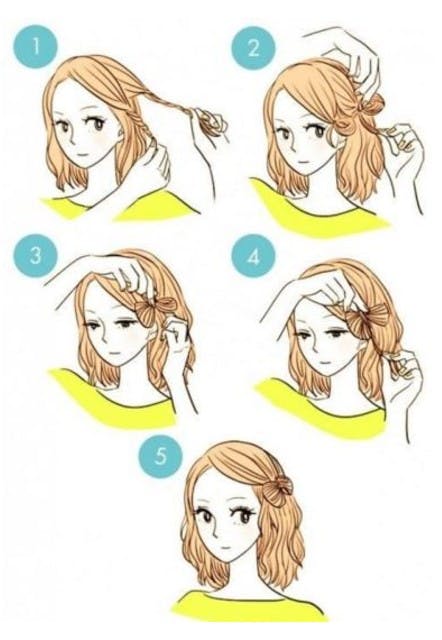
Pull one side up and around in order to form a bow and pin it down tightly.
No matter if you are getting ready for a sophisticated evening in town or want a hairstyle to enhance typical friday, there is always a variation of the bun that can improve any look. Now you can make a nice shape for each strand and get rid of any errors. Pull hair into a high ponytail, leaving a few sections loose at the front to frame the face. Proceed to place the glue all along the clip, one section at a time, and placing ribbon as you go. Tie your hair in the lower side with a loose hair band and take all hair strands through an opening above hairband. You can reuse ribbon scrap and leftover to customize a colorful bow. Holding the twist taught with one hand, make another loop on the opposite side on the bow. So, gather those items, have a seat, and make a pretty ponytail bow. When you get to the bottom of the outside of the clip open the clip once again and glue the remainder of the ribbon inside the clip so that the entire alligator clip is now completely lined. Gently fold the bigger piece, and half glue the ends together to form. Split the ponytail into two sections and backcomb. Remove the hairgrips we have used before one by one after placing temporary ones. Instead of using the single color ribbon, use multiple color ribbons to get a trendy hair bend.
Cut two pieces of ribbon, one short (about 12 inches) and one long (depending on the size of your bow, 1 to 2 yards). This one is incredibly easy to make and replicate anytime. When you are done, cover it with your hair spray. Learn how to get this twisted crown braid for yourself by clicking the link above this image. How to make hair bows and hair accessories that are beautiful and easy to make!
How To Create A Bow Hairstyle Using Your Hair Video Tutorial And Steps from ath2.unileverservices.com This hairstyle is probably my most favorite! Straight hair is more desirable for this style than wavy or curly hair. Take the excess ponytail from the looped bun and. Form the first bow side with the loose loop. Now, the rest of your strands can be used in two ways. Create a loop with the end of your long piece of ribbon, then twist. Secure the ends in the elastic behind the bow in the back of your head. Remove the hairgrips we have used before one by one after placing temporary ones.
When you are done, cover it with your hair spray.
Straight hair is more desirable for this style than wavy or curly hair. Holding the twist taught with one hand, make another loop on the opposite side on the bow. Instead of using the single color ribbon, use multiple color ribbons to get a trendy hair bend. Use some water or hairspray, if necessary. When you are done, cover it with your hair spray. Push a bobby pin into the top part of the spread loop and another one into the base of the spread loop. Split the ponytail into two sections and backcomb. The two tails of the ribbon should be centered so you can wrap them and secure them with the alligator clip. Next draw out the two hanging ribbons and move to your last drawing step. Put your hair in a ponytail were ever you would like to put the bow. Secure the ends in the elastic behind the bow in the back of your head. The bun is a traditional hairstyle that can be used in a number of ways. Step 4 separate the bun top portion of hair into two to create the bow shape.
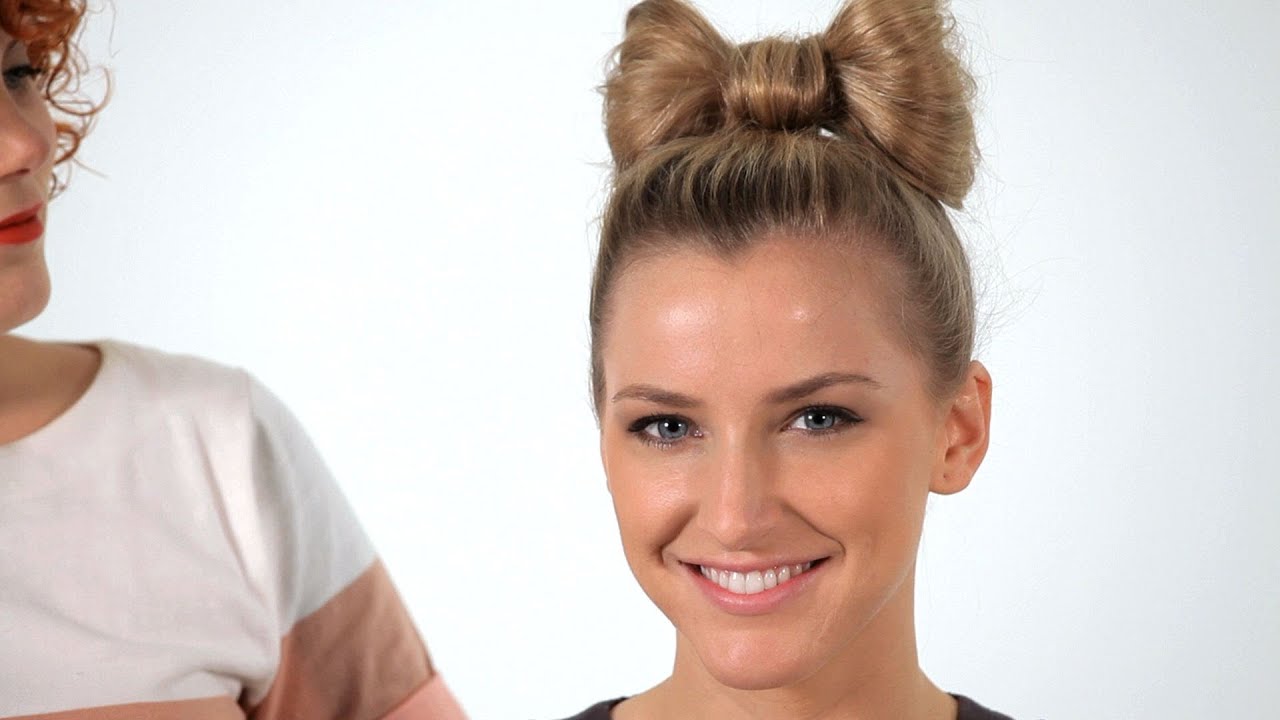
Pull one side up and around in order to form a bow and pin it down tightly. A hair elastic hair tie. The bun is a traditional hairstyle that can be used in a number of ways. The size of the loop you create will determine the size of your hair bow so adjust it to your preference. To get this look, pull a section of your hair to the end and turn it into a bun.
Kawaii Popular Japanese Hairstyles You Need To Try Nomakenolife The Best Korean And Japanese Beauty Box Straight From Tokyo To Your Door from images.prismic.io Straight hair is more desirable for this style than wavy or curly hair. A hair elastic hair tie. How to do a perfect hair bow! So, gather those items, have a seat, and make a pretty ponytail bow. Take the loose strands of hair from the end of your ponytail, and pull them forward and over the middle section of your top knot. On the other hand, you can let it be as it is. You can also complement it with fresh flowers to increase the wow factor of your little girl's hair bow. Spread it apart to widen it and push it flat against your head.
Turn the bow over so the right side is facing up and apply a large dot of hot glue right in the center.
These pictured hair bow tutorials teach you how to make diy hair ribbons, baby hair clips, hair clips, crochet hair bows, baby headbands and even how to make a headband holder to keep your accessories organized. This hairstyle is probably my most favorite! You can add more style to these ribbons by creating a small bow on the top. On the other hand, you can let it be as it is. Repeat the same movement with the other half and pin it. Place a temporary hairgrip on the top of the bow. Pull the ponytail up and over the top of your bow. This one is incredibly easy to make and replicate anytime. Cut two pieces of ribbon, one short (about 12 inches) and one long (depending on the size of your bow, 1 to 2 yards). A hair elastic hair tie. Next draw out the two hanging ribbons and move to your last drawing step. Now you can make a nice shape for each strand and get rid of any errors. Be careful not to make your loop bun too big or your bow will be floppy.


0 Comments